
Corners separate an average stone veneer job from a great one. Every outside corner is a high-visibility focal point where two wall planes meet, and the stone has to wrap that 90-degree transition without visible seams, mismatched heights, or cracked edges. That is why stacked stone corner pieces installation deserves its own planning phase before the first bag of mortar gets mixed.
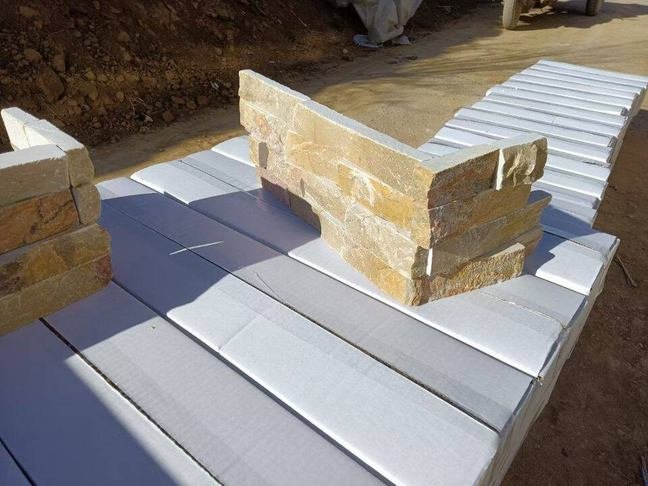
For years, installers had two choices: mitering field panels at 45-degree angles or accepting a visible seam at the corner. Pre-made L-corner pieces offer a better path. Factory-cut corners with staggered joints and matching profiles arrive ready to install, cutting corner labor time roughly in half compared to field-cutting.
This guide walks you through every stage of stacked stone corner pieces installation, from measuring and substrate prep through cutting, mortaring, and blending corners into field panels. We draw on 18+ years of manufacturing knowledge at Top Stone Panels in Hebei province, where every corner piece is cut on infrared CNC diamond blades and bonded with marine-grade epoxy.
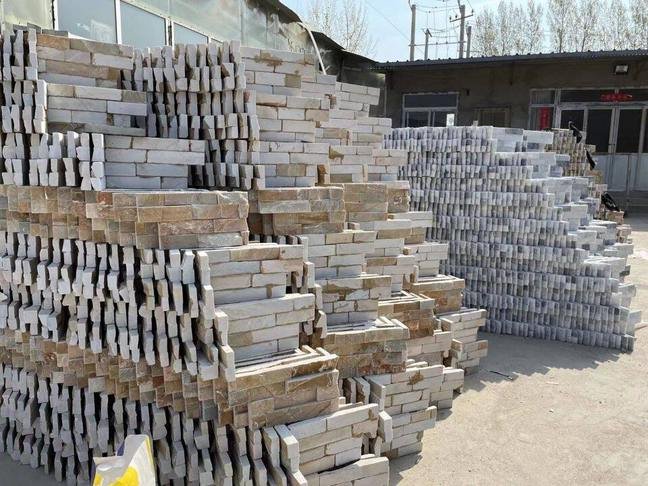
Types of Stacked Stone Corner Pieces
Not every corner looks the same, and not every project calls for the same solution. Top Stone Panels manufactures four corner styles, each matched to a specific panel system. Understanding the differences before you order helps you avoid costly on-site improvisation.
Pre-Made L-Corners (Stacked Stone Profile)
These are the workhorse corners for standard stacked stone panels. Each L-corner is a single piece of natural slate or quartzite that wraps both legs of a 90-degree outside corner. The split-face texture on both legs matches the field panels exactly. Staggered joints are built into the piece so that horizontal mortar lines on one face never align with lines on the return face, giving the installation a natural, hand-laid appearance. Panels come in 15x60cm and 15x55cm sizes, and matching L-corner kits ship with every order.
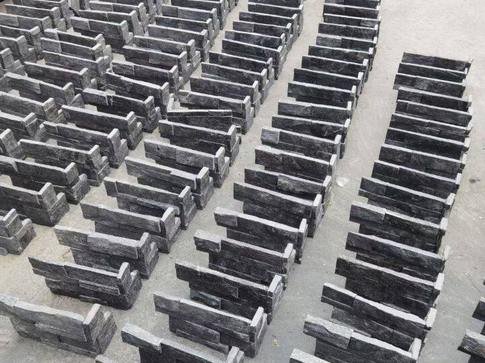
Flat Stone Corners
Flat stone corners serve a different design intent. Instead of wrapping the corner with a single L-shaped piece, two flat panels meet at a clean 90-degree joint with no 45-degree miter cutting required. One panel runs past the corner edge, and the second panel butts against it, creating a crisp shadow line. Flat corners pair well with thin ledgestone profiles where a smooth, linear aesthetic is the goal.
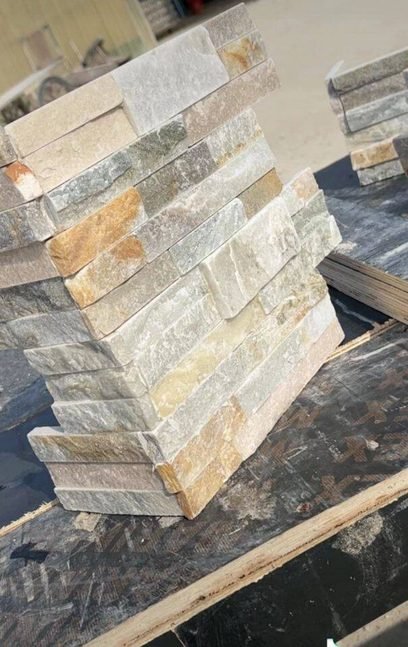
Loose Stone L-Shape Corners (Thin Stone Veneer)
When the project uses individual thin stone veneer pieces rather than interlocking panels, loose L-shape corners are the right fit. These are individual corner stones shaped to wrap a 90-degree edge, sold in bulk. They work well with thin stone veneer applications on irregular surfaces or projects where a random, rustic pattern is desired.
One-Piece L-Shape Corners (Z-Panel Systems)
Z-panels have a unique interlocking profile, and their corner pieces are engineered to match. A one-piece L-shape corner for Z-panel systems clips into adjacent Z-panels on both wall faces, maintaining the interlocking bond pattern around the corner.
Tools and Materials You’ll Need
Stacked stone corner pieces installation does not require exotic equipment. Gather everything the night before so you are not running to the truck mid-install.
Tools
- Tape measure (25-foot minimum)
- 4-foot level and a 12-inch speed square
- Chalk line and chalk
- Angle grinder with a continuous-rim diamond blade (4.5-inch or 5-inch)
- Wet saw with a 10-inch diamond blade (for straight cuts on larger pieces)
- Cold chisel (3/4-inch) and mason hammer
- Notched trowel (1/2-inch x 1/2-inch square notch)
- Margin trowel for buttering individual pieces
- Mortar mixing paddle and 1/2-inch drill
- Stiff-bristle brush for cleaning excess mortar
- Safety glasses, N95 dust mask, and hearing protection
- Buckets for mixing mortar and rinsing tools
Materials
- Pre-made stacked stone L-corner pieces (ordered to match your panel profile)
- Type S mortar (exterior) or Type N mortar (interior)
- Scratch coat mortar mix
- Metal lath and corrosion-resistant fasteners (for wood-frame or metal-stud substrates)
- Waterproof membrane or building paper (for exterior wood-frame walls)
- Clean water for mixing and rinsing
- Marine-grade epoxy (for repairing any shipping chips on corner edges)
If you have never installed stacked stone veneer panels before, our full stacked stone veneer installation guide covers the field-panel process from substrate prep through the final row.
Step 1: Measure and Plan Your Corner Layout
Grab your tape measure and start at the base of the corner. Measure the total height of the installation area on both wall faces. Write both numbers down. Even on a plumb wall the two faces can differ by half an inch due to foundation irregularities, and you want to plan for the taller face.
Calculate how many L-corner courses you need. Standard stacked stone panels are 15 cm (about 6 inches) tall. Divide the total height by the panel height and round up. A 96-inch wall needs 16 courses. Each L-corner piece covers one course on both faces, so you need one piece per course.
Plan your stagger pattern on paper. The horizontal joint on the left face should not align with the joint on the right face. Top Stone Panels L-corners come with a built-in half-course offset, which handles this automatically. Confirm that field panel courses on each wall will align with the corner piece courses. Mark a story pole (a straight 1×2 with course lines drawn on it) and set it beside the corner as a reference during installation.
Check the wall for plumb. Place a 4-foot level vertically on each face. If the wall is more than 1/4 inch out of plumb over 8 feet, plan to adjust your mortar bed thickness at the base to compensate.
Step 2: Prepare the Substrate at Corners
The corner takes more mechanical stress than any other part of the wall. Two planes of stone meet here, and gravity pulls on both. A solid substrate is non-negotiable.
Masonry substrates (concrete, CMU, brick): Clean the surface with a stiff brush and wash off dust or efflorescence. Apply a scratch coat of mortar approximately 1/2 inch thick, scoring it horizontally with a notched trowel for a mechanical key. Let it cure for at least 24 hours. For detailed instructions, see our guide on installing stone cladding on concrete block walls.
Wood-frame or metal-stud substrates: Start with a waterproof membrane over the sheathing. Install metal lath with corrosion-resistant fasteners, wrapping it continuously around the corner with at least 2 inches of extension on each face. Overlap sheets by 1 inch horizontally and 2 inches vertically. Apply a scratch coat over the lath, pressing mortar through the mesh. Let it cure for 24 hours.
The critical detail: make sure the scratch coat wraps fully around the corner arris. A bare spot here gives the mortar nothing to grip, and the corner piece can pop loose over time. Build the scratch coat up slightly at the arris for a full bed.
Step 3: Dry-Fit Corner Pieces Before Mortaring
Before you mix mortar, stack your L-corner pieces along the base of the corner and check the fit. Start at the bottom and work up.
Check three things. First, that heights stack evenly. If one piece is taller than the next, the discrepancy compounds as you go up and your horizontal joints will drift. Second, examine the stagger pattern: joints on one face should offset from the return face by roughly half a course. Third, check for gaps. Hold a straightedge along the back of the pieces and look for rocking or voids indicating an uneven substrate.
If you find height variations greater than 1/8 inch, mark those pieces for cutting. If the substrate has a dip or bulge, note where you will need a thicker or thinner mortar bed. Number each piece with a pencil on the back so you can set them in the same order when the mortar is ready. Dry-fitting takes 15 to 20 minutes on a typical single-story corner and saves you from discovering problems after mortar has started to set.
Step 4: Cut Corner Pieces to Size (When Adjustments Are Needed)
Even with factory-precision cutting, some corner pieces need trimming on site, whether to fit under a window sill, clear an obstruction, or adjust the final course. Here is how to make clean cuts without shattering the stone.
Angle Grinder with Diamond Blade
For most cuts, a 4.5-inch or 5-inch angle grinder fitted with a continuous-rim diamond blade is the right tool. Mark your cut line on the back of the L-corner piece. Clamp the piece securely with the split face down on a soft pad. Score the line to about one-third depth on the first pass, then complete the cut on the second. Let the blade do the work; forcing it will chip the edge.
Safety note: Always wear safety glasses, an N95 dust mask, and hearing protection when dry-cutting natural stone. Silica dust is hazardous. Cut outdoors or in a ventilated area.
Wet Saw with Diamond Blade
For long straight cuts on thicker quartzite, a 10-inch wet saw produces a smoother edge with less chipping and suppresses dust. Set the fence to your cut width, feed the piece slowly, and let the blade cut at its own pace.
Chisel and Mason Hammer
After scoring with the grinder, snap the waste section using a cold chisel and mason hammer. Place the chisel on the scored line and strike firmly. This technique works best on slate, which splits predictably. For quartzite, rely on the grinder or wet saw for the full cut.
One advantage of ordering from Top Stone Panels: our corner pieces arrive at precise dimensions thanks to infrared CNC diamond blade cutting. Most installs require only minor trimming at the top and bottom courses rather than cutting every piece. That factory precision reduces on-site stone waste by approximately 20 percent compared to field-cutting raw panels.
Step 5: Apply Mortar and Set Corner Pieces
With the layout planned, the substrate cured, and the dry fit confirmed, you are ready to mortar. Mix Type S mortar (exterior) or Type N mortar (interior) using a mixing paddle on a 1/2-inch drill. Add water gradually until you reach a thick peanut-butter consistency that holds its shape on the trowel without dripping.
Start at the bottom of the corner. Butter the back of the first L-corner piece with approximately 1/2 inch of mortar across the entire surface using your margin trowel. Press the piece firmly into the corner, pushing mortar out slightly at the edges. Hold for 10 to 15 seconds to allow the initial bond to grab. Check with your level that the piece is plumb and level on both faces.
Set the second course on top of the first, buttering and pressing firmly into place. Verify that the horizontal joint is consistent, typically 1/8 to 1/4 inch thick. Continue stacking upward, checking plumb every three courses with your 4-foot level and referencing your story pole.
Work in manageable sections. Mortar skins over in 30 to 45 minutes depending on temperature. Only set as many pieces as you can install within that window. Wipe excess mortar off the stone face immediately with a damp sponge or stiff-bristle brush. Once mortar cures on the split face, removing it without damaging the texture is nearly impossible.
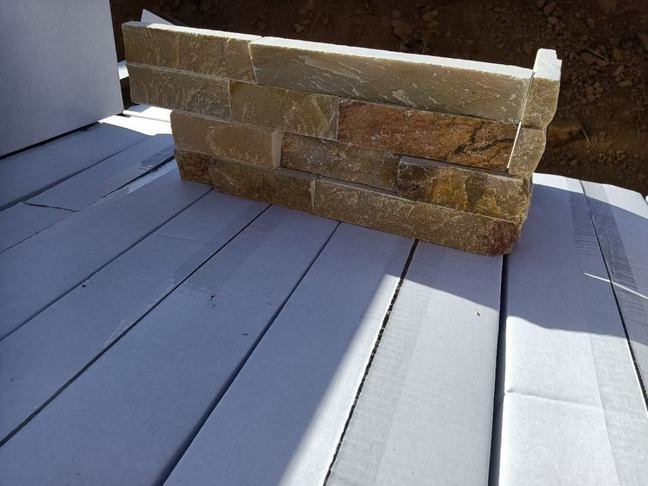
Step 6: Blend Corners with Field Panels
The corner pieces are set. Now the real test: making the transition from the corner to the field panels look seamless. If you marked your story pole correctly and matched course heights, horizontal joints should run continuously from the corner outward.
Start installing field panels on one wall face, working outward from the corner. Butter the back of each stacked stone panel with mortar and press it into place, keeping the top edge aligned with the corresponding corner piece course. Where a field panel meets the corner piece, the joint should be no wider than the others. Trim the panel with your grinder to close any gaps.
Move to the adjacent wall face and repeat. The field panels on the return wall butt cleanly against the return leg of the L-corner pieces. Because the return leg extends past the corner arris, field panels on the adjacent wall meet it flush, eliminating the need for 45-degree miter cuts. Step back frequently and view the wall from a distance to catch misaligned joints. Rotate panels from different boxes to blend color variation naturally. For more on planning a full field-panel layout, see our guide to the six types of stone veneer panels available for distributors and stock.
Common Mistakes to Avoid During Stacked Stone Corner Pieces Installation
After supplying corner pieces to hundreds of projects across North America and Europe, we have seen the same installation errors repeat. Avoid these six mistakes and your corners will look right the first time.
1. Skipping the dry fit. Mortaring corner pieces without dry-fitting first is the most common error. A height mismatch or substrate issue you could have caught in five minutes becomes a problem requiring you to pry off set stone and start over.
2. Using the wrong mortar type. Thin-set adhesive or mastic has no place in stacked stone installation. Type S mortar provides the bond strength and bed thickness that natural stone corners require, especially on exterior walls subject to freeze-thaw cycles.
3. Not wrapping metal lath around the corner. On framed walls, lath must wrap continuously around the corner arris with at least 2 inches of extension on each face. If the lath stops at the corner, the scratch coat lacks reinforcement at the highest-stress point.
4. Aligning horizontal joints on both faces. When joints on one corner face line up with joints on the return face, the corner looks tiled and manufactured. The staggered joint pattern in Top Stone Panels L-corners prevents this automatically when installed in the correct orientation.
5. Rushing the mortar set. Hold each corner piece for 10 to 15 seconds after pressing it into mortar. If it sags after you release, the mortar is too wet or the bed is too thick. Adjust your mix and try again.
6. Forgetting to clean as you go. Mortar smeared on the split face is easy to wipe off when wet. Once cured, you need acid to remove it, and acid can alter the stone color. Keep a damp sponge handy and wipe every piece immediately after setting.
Pro Tips from Top Stone Panels Factory
These tips come from 18+ years of manufacturing stone cladding and working alongside installers on job sites across three continents.
Order corners as a kit with your panels. Every Top Stone Panels stacked stone order includes matching L-corner kits cut from the same stone lots. Ordering corners separately from a different supplier almost guarantees a color and texture mismatch.
Use factory-precision corners to reduce labor. Our infrared CNC diamond blade cutting system produces corner pieces with tolerances under 1 mm. That precision eliminates trial-and-error fitting. On average, pre-made L-corners from our factory save roughly 50 percent of the labor time compared to mitering panels in the field.
Seal the corner arris on exterior installations. The corner edge is the most exposed point on the wall. After mortar has fully cured (28 days minimum), apply a penetrating stone sealer to the arris and the first 6 inches of each face to slow moisture absorption and reduce freeze-thaw spalling.
Store corner pieces flat and protected. L-corner pieces have two legs that create a natural weak point. Stack them flat, do not stand them on edge, and keep them covered from rain.
Repair chips with marine-grade epoxy. If a corner piece chips during shipping or handling, mix a small batch of marine-grade epoxy, fill the chip, and press in any recovered stone fragments. After curing, the repair is invisible on the textured split face.
For a complete overview of how our panels are made, see our explainer on what stacked stone panels are. If you are installing on an exterior wall and want full substrate-to-finish details, our guide on installing thin stone veneer on exterior walls covers weather barriers, weep systems, and flashing.
Frequently Asked Questions About Stacked Stone Corner Installation
Do you need special corner pieces for stacked stone?
Yes. Pre-made L-corner pieces wrap around 90-degree outside corners without field-mitering. They feature a natural split face on both legs and staggered joints that match the stacked stone panel profile. Using standard flat panels at corners requires 45-degree miter cuts, which waste material and take significantly more labor.
How do you cut stacked stone corners on site?
Use an angle grinder fitted with a continuous-rim diamond blade. Mark your cut line on the back of the L-corner piece, score to about one-third depth on the first pass, then complete the cut on the second. A 10-inch wet saw works well for thicker quartzite. You can also score and snap slate corners with a cold chisel and mason hammer. Always wear safety glasses and an N95 dust mask.
What mortar should I use for stacked stone corner pieces?
Type S mortar is the standard for exterior installations because of its high compressive strength (minimum 1,800 psi) and superior bond strength. Type N mortar works for interior applications. Mix to a thick peanut-butter consistency and butter the back of each piece with approximately 1/2 inch of mortar. Never use thin-set adhesive, mastic, or construction adhesive as a substitute.
Can pre-made stone corners save time compared to field-cutting?
Pre-made stone corners typically save about 50 percent of the labor time compared to mitering panels on site. Factory-cut L-corners from Top Stone Panels are precision-cut with infrared CNC diamond blades, which eliminates trial-and-error fitting and reduces on-site stone waste by roughly 20 percent. On large commercial projects with dozens of corners, the time savings translate directly into lower labor costs.
How do you handle inside corners with stacked stone?
Inside corners do not require special L-corner pieces. Run panels on one wall face up to the corner, then butt adjacent-wall panels against them. Leave a 1/8-inch gap for mortar and stagger the joints so they do not create a continuous vertical line.
Ready to Streamline Your Next Corner Installation?
Corner work should not slow your crew down or blow your stone budget. Top Stone Panels ships pre-made L-corner kits matched to every stacked stone, thin ledgestone, thin stone veneer, and Z-panel order. Each piece is cut on our infrared CNC diamond blades and bonded with marine-grade epoxy at our factory in Hebei province, arriving at exact dimensions and ready to set. Our minimum order is one 20-foot container, and our Zero-Breakage Protocol packaging protects every corner piece in transit.
Contact our team to discuss your project specifications, request samples, or get a quote on corner pieces matched to your panel order.



